The FatFS file system is a well-known file system in the field of microcontrollers. Due to its lightweight and compatibility, it is favored by MCU developers. When implementing tasks such as reading and writing files on U disks and SD cards, we often need a file system to support our work. Especially in some MCU applications, the addition of a file system can significantly improve the friendliness of system interaction. In this article, we introduce the transplantation and application of FatFS file system on STM32F4.
Feature of FatFS
- DOS/Windows compatible FAT/exFAT file system.
- Platform independent and easy to transplant.
- The program code and workspace take up very little space.
- Supports the following various configuration options:
- Long filenames in ANSI/OEM or Unicode.
- exFAT file system, 64-bit LBA and GPT to store large amounts of data.
- Thread safety of RTOS.
- Multiple volumes (physical drives and partitions).
- Variable sector size.
- Multiple code pages, including DBCS.
- Read-only, optional API, I/O buffers, etc.
FatFS Transplantation on MCU
Preparation
We need to make some necessary preparations before starting FatFS transplantation. First, you need to prepare the corresponding hardware platform. We are using the STM32F407VET6 operating platform here. The porting work of USB hardware-related libraries has also been completed.
Secondly, we also need to prepare the relevant source code of FatFS. Here we use the latest R0.14b version, which can be downloaded from the website:
http://elm-chan.org/fsw/ff/00index_e.html
After the downloaded source code is decompressed, there are two folders: document and source. The document folder contains relevant documentation, which is the same as the content on the website. You can view these documents to work during transplantation. The Source folder contains source code related files, mainly including:
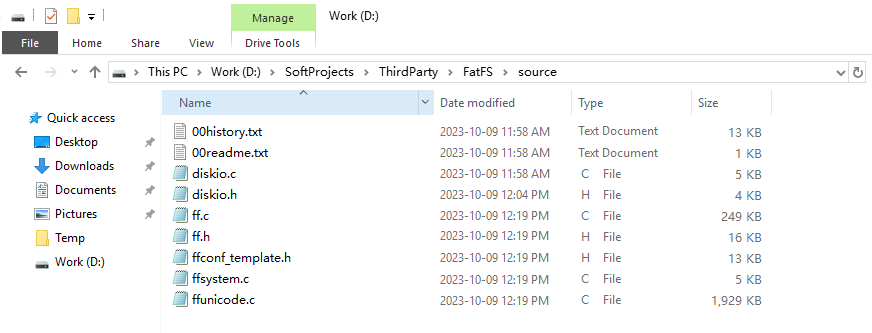
Among the series of files shown in the picture above, the 00readme.txt file has an introduction to each file. We view its contents as follows:
| File Name | Description |
|---|---|
| 00readme.txt | Readme file |
| 00history.txt | Version history file |
| ff.c | FatFs module |
| ffconf.h | Configuration file for the FatFs module |
| ff.h | Header file for the FatFs application module |
| diskio.h | Header file for the FatFs and disk I/O module |
| diskio.c | An instance that attaches disk I/O functions to FatFS |
| ffunicode.c | Unicode encoding utility functions |
| ffsystem.c | Optional operating system-related file instance |
Among these files, ff.c and ff.h are core files. ffunicode.c is the character encoding, and the encoding will be selected according to the configuration of the configuration file. The ffsystem.c file is determined according to your own needs. Therefore, the files that are related to the specific application platform and need to be implemented by us are the configuration file ffconf.h and the disk operation files diskio.h and diskio.c. These files are also the focus of our transplantation.
Implement Transplantation
We have completed the preparation work for transplantation, and now we will implement the application transplantation for large-capacity USB disks. As we have said before, the files that need to be processed for transplantation are the configuration file ffconf.h and the disk operation files diskio.h and diskio.c.
About the configuration file ffconf.h, it actually has an instance of itself. We only need to modify the configuration as needed. The configuration parameters we need to modify here include:
The supported encoding method configuration parameter FF_CODE_PAGE is related to the issue of file encoding. We configure it to support Simplified Chinese.
The number of logical drives is configured with the parameter FF_VOLUMES. FatFS can be applied to multiple drives at the same time, so we need to configure the number of drives according to the actual situation.
Time stamp configuration parameter FF_FS_NORTC, most of the time we do not need to record timestamps, so we turn it off here.
The rest are related functions to implement disk IO operations. The FatFS help document tells us that there are two types of functions that need to be implemented: one is functions related to disk device control, mainly functions to obtain device status, initialize device functions, and read. Data functions, write data functions and control device related function functions; the second category is the real-time clock operation function, which is mainly used to obtain the current time function. Therefore, implementing these 6 functions is the main task of transplantation.
Get device status function
Disk status detection function disk_status. Used to detect disk status and will be called in the ff.c file. Its function prototype is as follows:
ˆ DSTATUS disk_status(BYTE drV);
According to its prototype definition and the requirements of our USB mass storage device, we can implement the disk status acquisition function as follows:
					/*Status acquisition function for USBH*/
static DSTATUS USBH_status(BYTE lun)
{
DRESULT res = RES_ERROR;

if(USBH_MSC_UnitIsReady(&hUsbHostFS, lun))
{
  res = RES_OK;
}
else
{
  res = RES_ERROR;
}

return res;
}
Initialize device function
Storage media initialization function disk_initialize. It is used to initialize the disk device and will be called in the ff.c file. Its function prototype is as follows:
ˆ DSTATUS disk_initialize(BYTE drv);
According to its prototype definition and the requirements of our USB mass storage device, we can implement the disk drive initialization function, but we don’t actually need it here, because the initialization has been completed in the USB HOST library, so just return the correct function directly.
					/*Initialization function for USBH*/
static DSTATUS USBH_initialize(BYTE lun)
{
  //Initialization has been completed in the USB HOST library
return RES_OK;
}
Read data
Read sector function disk_read. It is used to read disk data. It is written according to the specific disk IO and will be called in the ff.c file. Its function prototype is as follows:
- DRESULT disk_read(BYTE drv, BYTE*buff, DWORD sector, BYTE.count);
According to its prototype definition and the requirements of our USB mass storage device, we can implement the disk data reading function as follows:
					/*Read sector function for USBH*/
static DRESULT USBH_read(BYTE lun, BYTE *buff, DWORD sector, UINT count)
{
DRESULT res = RES_ERROR;
MSC_LUNTypeDef info;

if(USBH_MSC_Read(&hUsbHostFS, lun, sector, buff, count) == USBH_OK)
{
  res = RES_OK;
}
else
{
  USBH_MSC_GetLUNInfo(&hUsbHostFS, lun, &info);

  switch(info.sense.asc)
{
  case SCSI_ASC_LOGICAL_UNIT_NOT_READY:
  case SCSI_ASC_MEDIUM_NOT_PRESENT:
  case SCSI_ASC_NOT_READY_TO_READY_CHANGE:
   USBH_ErrLog ("USB Disk is not ready!");
   res = RES_NOTRDY;
   break;

  default:
   res = RES_ERROR;
   break;
}
}

return res;
}
Write data
Write sector function disk_write. It is used to write disk data. It is written according to the specific disk IO and will be called in the ff.c file. Its function prototype is as follows:
- DRESULT disk_write(BYTE drv, const BYTE*buff, DWORD sector, BYTE count);
According to its prototype definition and the requirements of our USB mass storage device, we can implement the disk data writing function as follows:
					/*Write sector function for USBH*/
static DRESULT USBH_write(BYTE lun, const BYTE *buff, DWORD sector, UINT count)
{
DRESULT res = RES_ERROR;
MSC_LUNTypeDef info;

if(USBH_MSC_Write(&hUsbHostFS, lun, sector, (BYTE *)buff, count) == USBH_OK)
{
  res = RES_OK;
}
else
{
  USBH_MSC_GetLUNInfo(&hUsbHostFS, lun, &info);

  switch(info.sense.asc)
{
  case SCSI_ASC_WRITE_PROTECTED:
   USBH_ErrLog("USB Disk is Write protected!");
   res = RES_WRPRT;
   break;

  case SCSI_ASC_LOGICAL_UNIT_NOT_READY:
  case SCSI_ASC_MEDIUM_NOT_PRESENT:
  case SCSI_ASC_NOT_READY_TO_READY_CHANGE:
   USBH_ErrLog("USB Disk is not ready!");
   res = RES_NOTRDY;
   break;

  default:
   res = RES_ERROR;
   break;
}
}

return res;
}
Control device related functions
Storage media control function disk_ioctl. You can write the functional code you need in this function, such as obtaining the size of the storage medium, detecting whether the storage medium is powered on or not, and the number of sectors of the storage medium, etc. If it is a simple application, there is no need to write it. Its function prototype is as follows:
- DRESULT disk_ioctl(BYTE drv, BYTE ctrl, VoiI*buff);
According to its prototype definition and the requirements of our USB mass storage device, we can implement the disk device control related functions as follows:
					/*USBH IO control function */
static DRESULT USBH_ioctl(BYTE lun, BYTE cmd, void *buff)
{
DRESULT res = RES_ERROR;
MSC_LUNTypeDef info;

switch(cmd)
{
/* Make sure that no pending write process */
case CTRL_SYNC:
  res = RES_OK;
  break;

/* Get number of sectors on the disk (DWORD) */
case GET_SECTOR_COUNT :
  if(USBH_MSC_GetLUNInfo(&hUsbHostFS, lun, &info) == USBH_OK)
{
   *(DWORD*)buff = info.capacity.block_nbr;
   res = RES_OK;
}
  else
{
   res = RES_ERROR;
}
  break;

/* Get R/W sector size (WORD) */
case GET_SECTOR_SIZE :
  if(USBH_MSC_GetLUNInfo(&hUsbHostFS, lun, &info) == USBH_OK)
{
   *(DWORD*)buff = info.capacity.block_size;
   res = RES_OK;
}
  else
{
   res = RES_ERROR;
}
  break;

  /* Get erase block size in unit of sector (DWORD) */
case GET_BLOCK_SIZE :

  if(USBH_MSC_GetLUNInfo(&hUsbHostFS, lun, &info) == USBH_OK)
{
   *(DWORD*)buff = info.capacity.block_size / USB_DEFAULT_BLOCK_SIZE;
   res = RES_OK;
}
  else
{
   res = RES_ERROR;
}
  break;

default:
  res = RES_PARERR;
}

return res;
}
Get the current time
Real-time clock function get_fattime. Used to obtain the current time and return a 32-bit unsigned integer. The clock information is contained in these 32 bits. If you do not use a timestamp, you can directly return a number, such as 0. Its function prototype is as follows:
ˆ DWORD get_fattime(Void);
According to its prototype definition and the requirements of our USB mass storage device, we can implement the disk status acquisition function as follows:
					/*Read clock function*/
DWORD get_fattime(void)
{

return 0;

}
Complete the writing of the above 6 programs, and the transplantation work is basically completed. You may find that the function name we implemented seems to be different from the prototype function. This is mainly to facilitate operations when multiple storage devices exist at the same time. We can just call the function we implemented in the target function.
Application Testing
We have completed the transplantation of FatFS, now let’s verify whether the transplantation is correct. To this end, let’s write an application to write data to a file on a USB flash drive and read file data.
					/* USB HOST MSC operation function, this part of the function is set according to needs */
static void MSC_Application(void)
{
  FRESULT res; /* FatFs function return value */
  uint32_t byteswritten, bytesread; /* Number of files read and written */
  uint8_t wtext[] = "This is STM32 working with FatFs!"; /* Write file buffer */
uint8_t wtext2[] = "This is an example of FatFs reading and writing!"; /* Write file buffer */
uint8_t wtext3[] = "This is a test of appending data to a file!"; /* Write file buffer */
  uint8_t rtext[100]; /* Read file buffer */

  /* Register the file system object to the FatFs module */
  if(f_mount(&USBHFatFS, (TCHAR const*)USBHPath, 0) != FR_OK)
{
    /* Error handling */
    Error_Handler();
}
  else
{
    /* Open a file */
    if(f_open(&USBHFile, "STM32.TXT", FA_OPEN_EXISTING | FA_WRITE) != FR_OK)
   {
      /* Error handling */
      Error_Handler();
   }
    else
   {
      res=f_lseek(&USBHFile,f_size(&USBHFile)); //Point the pointer to the end of the file
      //res=f_lseek(&USBHFile,100); //Point the pointer to the end of the file
      /* Write data to file */
      res = f_write(&USBHFile, wtext, sizeof(wtext), (void *)&byteswritten);
      res = f_write(&USBHFile, "\r\n", sizeof("\r\n")-1, &byteswritten);
      res = f_write(&USBHFile, wtext2, sizeof(wtext2), (void *)&byteswritten);
      res = f_write(&USBHFile, "\r\n", sizeof("\r\n")-1, &byteswritten);
      res = f_write(&USBHFile, wtext3, sizeof(wtext3), (void *)&byteswritten);
      res = f_write(&USBHFile, "\r\n", sizeof("\r\n")-1, &byteswritten);

      if((byteswritten == 0) || (res != FR_OK))
     {
        /* Error handling */
        Error_Handler();
     }
      else
     {
        /* Close file */
        f_close(&USBHFile);

        /* Open file for reading */
        if(f_open(&USBHFile, "STM32.TXT", FA_READ) != FR_OK)
       {
          /* Error handling */
          Error_Handler();
       }
        else
       {
          /* Read data from file */
          res = f_read(&USBHFile, rtext, sizeof(rtext), (void *)&bytesread);

          if((bytesread == 0) || (res != FR_OK))
         {
            /* Error handling */
            Error_Handler();
         }
          else
         {
            /* Close file */
            f_close(&USBHFile);

            /* Compare read and written data */
            if((bytesread != byteswritten))
           {
              /* Error handling */
              Error_Handler();
           }
            else
           {
              /* No errors */

           }
         }
       }
     }
   }
}

  FATFS_UnLinkDriver(USBHPath);
}
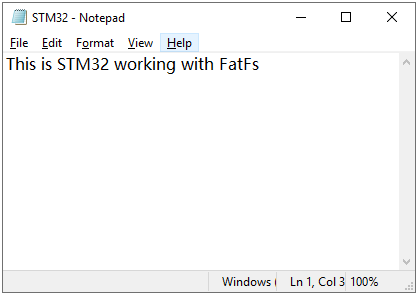
The file we first created on the USB disk is named “STM32.TXT”. In the above source code, after we create the file, we modify it to open and exist. Write “This is STM32 working with FatFs!” to the created STM32.TXT file, as shown in the figure below:
Next we try to append content to an already existing file. It is still the STM32.TXT file, as shown below:
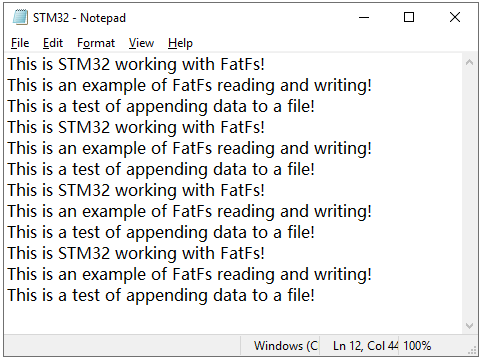
At this point, we have completed the transplantation and testing of the FatFS file system. From the test results, the transplantation is correct, at least no problems were found in simple applications.
Conclusion
In this article, we transplanted the FatFS file system to STM32F4 and conducted a simple read and write test. Judging from the test results, there is no problem in the FatFS transplantation process.
When we ported, we considered the ease of operation when multiple drives are available at the same time. The disk IO operation function we define needs to be implemented based on the actual hardware, and then the disk IO function we wrote is called in the callback function specified by the system.

