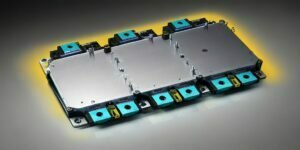
About ESP32-CAM
ESP32-CAM is a small-sized camera module released by Ai-Thinker Co., Ltd, which can work independently as the smallest system, with a size of 27*40.5*4.5mm and a minimum deep sleep current of 6mA.
Features of ESP32 CAM
- Camera Interface (Up to 24MP)
- Wi-Fi & Bluetooth Connectivity
- ESP32-D0WDQ6 dual-core processor
- 520KB SRAM
- 4MB Flash Memory
- OV2640 2MP Camera Module
- Supports JPEG & BMP format
- USB Type-C interface
- LiPo Battery Connector
- 32bit CPU, up to 240MHz
- Integrated 802.11b/g/n HT40 Wi-Fi transceiver
- Integrated dual-mode Bluetooth (classic and BLE)
- Integrated PCB antenna
- Integrated 8MByte PSRAM
- On-board camera
- External connector for camera
- 5 x programmable GPIOs
- 2 x UART, 2 x SPI, I2C, I2S, IRDA, PWM, GPIOs
ESP32 CAM Pinout

ESP32-CAM has three GND pins and two pins for power: 3.3V or 5V.
GPIO 1 and GPIO 3 are serial pins. You need these pins to upload code to your board. Also, GPIO 0 plays an important role as it determines whether the ESP32 is in blink mode or not. When GPIO 0 is connected to GND, the ESP32 is in blink mode.
The following pins are connected internally to the microSD card reader:
GPIO 14: CLK
GPIO 15: CMD
GPIO 2: Data 0
GPIO 4: Data 1 (also connected to onboard LED)
GPIO 12: Data 2
GPIO 13: Data 3
ESP32 Cam Project Development
Environment build
Hardware
- ESP32-CAM module
- OV2640 camera
- USB to serial port board (USB-TTL)
- dupont line
- 5V 2A power supply
The ESP32-CAM module is powered separately, U0TXD, U0RXD and GND are connected to the serial port board and connected to the computer, and the camera is connected to the module through a cable.
Before programming, the GPIO0 of the ESP32-CAM module needs to be grounded and reset. After the programming is completed, GPIO0 is suspended and reset to enter the working mode.
System environment
ESP32 can be developed on different systems. Here is an introduction to the development environment of the Ubuntu desktop version (the version is Ubuntu 18.04.3).
Set up download server
Run “Software & Updates”, click the “Download from” drop-down box on the “Ubuntu Software” tab, select “Other…”, find “China” and select any server, click “Choose Server”, and then enter the password to confirm. When it is closed, it will prompt to update the information, click “Reload” to update.

Install software
sudo apt-get purge vim-common
sudo apt-get install vim
sudo apt install git
Install dependent environment
sudo apt-get install git wget flex bison gperf python python-pip python-setuptools python-serial python-click python-cryptography python-future python-pyparsing python-pyelftools cmake ninja-build ccache libffi-dev libssl-dev
Project code and development environment
pull item
Pull project and submodules at the same time:
git clone --recurse-submodules https://github.com/Ai-Thinker-Open/Ai-Thinker-Open_ESP32-CAMERA_LAN.git
If the pull is interrupted, you need to enter the project directory to pull the submodule again:
cd Ai-Thinker-Open_ESP32-CAMERA_LAN/
git submodule update --init --recursive
Development Framework
After the project is pulled, you can see that there is an esp-idf directory in the project directory. esp-idf (Espressif IoT Development Framework) is the esp development framework. The project development environment is built through esp-idf. The idf version in this project is esp- idf-v4.0.
Set the IDF_PATH path
Edit the .bashrc configuration file:
cd esp-idf/
vim ~/.bashrc
Use the vim command to open .bashrc, use the keyboard to move the cursor to the end of the file, press a to enter, press Enter at the end to go to a blank line, and enter the corresponding content according to the following format to set the IDF_PATH variable:
# export IDF_PATH=<esp-idf absolute path>, the example is as follows
export IDF_PATH=/home/user/Desktop/esp32/Ai-Thinker-Open_ESP32-CAMERA_LAN/esp-idf
After the input is complete, press esc to cancel editing, :wq to save and exit, execute the following command to make the modification take effect immediately:
source ~/.bashrc
Query whether the variable is valid:
echo $IDF_PATH
If the printed path is consistent with the setting, go to the next step, otherwise you need to re-operate.
Install development tools
Run the install.sh script in the esp-idf directory:
./install.sh
Then the terminal prompts the download information. After printing “All done!”, the installation is complete. At this time, run the export.sh script to set the environment variable:
. ./export.sh
Note that there is a space after the first “.”, which needs to be executed every time you open the terminal for project development and debugging.
After the execution of the script, “Done!” is printed to indicate success, and then the project can be configured, compiled, and downloaded.
Configure, Compile and Download
Project configuration
Enter the demo project directory “Ai-Thinker-Open_ESP32-CAMERA_LAN/examples/single_chip/camera_web_server”
cd ../examples/single_chip/camera_web_server/
Then we start to configure the project:
make menuconfig
The prompt “recipe for target ‘mconf.o’ failed” is a dependency problem, enter sudo apt-get install libncurses5-dev to install the relevant dependencies and try again.
The configuration interface is as follows:

Use the arrow keys and the Enter key to move the cursor to operate, enter the “Serial flasher config” interface and refer to the following figure for setting, here the serial port is set to “/dev/ttyUSB0”, and it needs to be set to connect to the ESP32-CAM module during operation serial port.

Enter “Camera Web Server”->”Camera Pins”->”Select Camera Pinout” interface, select “ESP32-CAM by AI-Thinker”.

Enter the “Camera Web Server”->”Wifi Settings” interface to set the Wifi mode, “Wifi STA SSID” & “Wifi STA Password” and “Wifi AP SSID” & “Wifi AP Password” to set one of them.
(Wifi STA means Station mode, ESP32-CAM connects to Wifi network of other devices; Wifi AP means AP mode, computer or mobile phone connects to Wifi hotspot opened by ESP32-CAM)
The Wifi AP mode is used here, and the “Wifi AP IP Address” below sets the IP address of the module in Wifi AP mode.

After the setting is completed, use the left and right keys to move the lower cursor to “<Save>” and press Enter to save, and then move to “<Exit>” to exit the configuration.
Compile and Download
compile:
make
download:
make flash
It should be noted that the module GPIO0 should be grounded and reset before programming.
When downloading make flash, the previously configured port “/dev/ttyUSB0” is used by default, and other ports can be specified by the -p parameter: make flash -p [PORT]
If it prompts that the failure to open the serial port may be caused by a permission problem, you can open all permissions of the serial port with sudo chmod -R 777 <port>, such as sudo chmod -R 777 /dev/ttyUSB0, but all permissions of the open serial port will become invalid after the serial port is unplugged. In addition, the current user can be added to the dialout group sudo usermod -a -G dialout <username>
Receive serial port print information:
make monitor
It should be noted that the module GPIO0 should be suspended to power on or reset when working.
In addition, you can also use the serial port assistant to view the module printing information.
Take Photo & Video
After downloading the demo firmware, the ESP32-CAM module is powered on and running. Connect the computer or mobile phone to the network where the module is located, and access the module address in the browser.
In Station mode, the module address is the IP address assigned by the Wifi hotspot device to the module; in AP mode, it is the address set by “Wifi AP IP Address”.
On the module webpage, click the “Get Still” button under the operation bar on the left to take a photo, and the “Start Stream” button to record a video. After taking a photo or video, the image will be displayed on the webpage.
View the module operation interface on the mobile phone as follows, you can click “Save” in the upper right corner of the image to save the image.