Are you finding the programmable weighing indicators? Here you can learn useful knowledges of them such as the different programmable weighing indicators, how to set up them, the common features benefits, applications and troubleshooting.
Our company has been focused on the development of electronic products for a long time. So if you have any demand about the programmable weighing indicator or others, we are here to help you.
What is a Programmable Weighing Indicator?
A programmable weighing indicator is a device used to measure the weight of objects. It is usually connected to a load cell, which converts the physical force of the weight into a digital signal which is then read by the indicator. The indicator itself contains a software program which allows the user to customize the settings and indicators for the scale, such as the unit of measurement, calibration procedure, the number of decimal places, and more. Programmable weighing indicators can also be connected to other pieces of equipment, such as computers and printers, in order to generate reports and data. For example, a programmable weighing indicator can be used to measure the weight of a shipment of goods, which can then be printed on a shipping label.
Types of Programmable Weighing Indicators
Traditional Weighing Indicator
The traditional weighing indicator is generally composed of error amplifier, reversible motor, balance bridge, excitation power supply, dial and pointer, etc., and works according to the principle of self-balancing electronic potentiometer. It has slow weighing speed, single function and low accuracy, and has been basically eliminated.
Digital Weighing Indicator
The modern digital weighing indicator has higher accuracy, sampling accuracy, sampling speed, sensitivity, display status, temperature and humidity, etc.
Benefits of using a Programmable Weighing Indicator
• Automation: Programmable weighing indicators can be programmed to automatically perform various tasks such as printing receipts, calculating total weights, controlling the flow of materials, and more. This eliminates the need for manual monitoring and data entry.
• Accuracy: Programmable weighing indicators can measure and display weight with a high degree of accuracy, ensuring accuracy in the final product or weight measurements.
• Cost-effectiveness: Programmable weighing indicators are generally more cost-effective than traditional scales, as they can be used in multiple applications with minimal maintenance and calibration.
• Versatility: Programmable weighing indicators can be used in a variety of industries such as agriculture, food processing, packaging, retail, and more.
• Connectivity: Programmable weighing indicators can be connected to other devices such as computers, printers, and networks for easy data transfer and analysis.
Features of a Programmable Weighing Indicator
- with a lot of peripheral interface;
- More accurate, faster and stable;
- Sensor excitation power supply, easy to use;
- Using ratio A/D conversion and frequency doubling technology;
- The setting unit is convenient to change and has strong versatility;
- The software can truly simulate vibration, empty scale change, material drop, etc;
- Multi-function: empty scale zero setting, zero point tracking, calibration, maximum weighing, indexing position and so on.
Common Applications
- Industry goods in a production line
- Warehouse containers and pallets
- Pharmaceutical industry medicines
- Food processing industries ingredients
- Shipping and mail services parcels and packages
- Agricultural industry farm produce
- Automotive industry components
Different Programmable Weighing Indicators
There’re so many programmable weighing indicators on the market. It’s important you choose one base on your specific requriement. Below are some models of programmable weighing indicators for references:
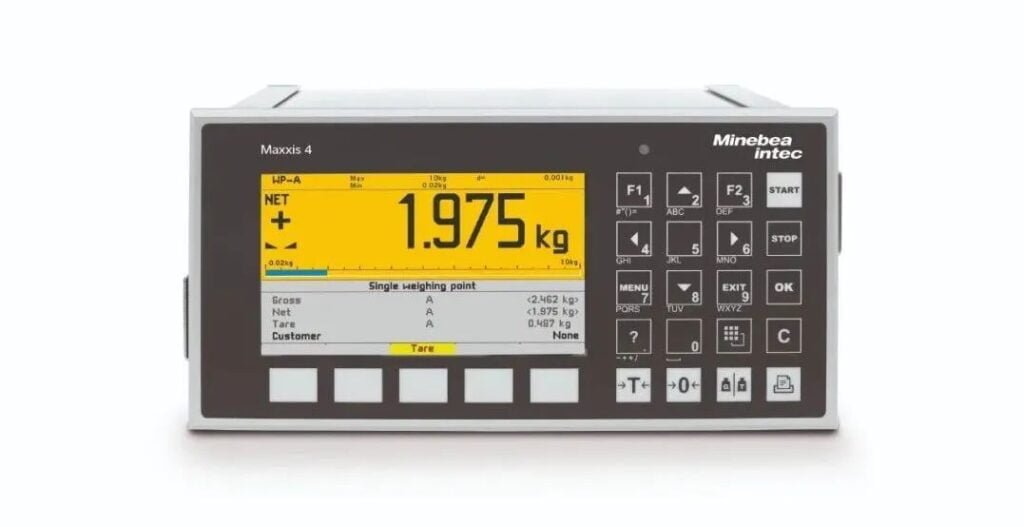
Minebea-intec Maxxis 4 Programmable weighing Indicator
The Maxxis 4 freely programmable weighing controller combines precision, connectivity and functionality for a variety of applications. The Maxxis 4 controls all modern automated processes easily and reliably, from simple weighing tasks to single-component filling or complex dosing.

Features
- Connect to analog or digital scales or Pendeo® digital load cell systems
- Large 4.3-inch color display with multilingual interface and integrated help function
- Multiple interface possibilities: Ethernet TCP/IP, Modbus TCP, Profibus DP, DeviceNet, Profinet, Ethernet/IP and USB
- Equipped with an internal web server, Maxxis 4 can be configured and controlled via any standard web browser
- Auto-backup feature saves data to SD card for full transparency and traceabilit
Jinzhong Group's XK3102D1 Smart Weighing Indicator
XK3102D1 intelligent weighing indicator is mainly used in analog/digital truck scales, rail scales and other weighing fields. It has the characteristics of accurate weighing, multi-scale value switching, nonlinear compensation, remote intelligent monitoring, and fault self-diagnosis. It has powerful functions and is easy to operate. , strong adaptability.

Features
- Compatible with a variety of sensors: support Jinzhong full range of sensors including analog sensors, RS422 bus digital sensors, RS485 bus digital sensors, CAN bus digital sensors;
- Rich expansion interfaces: support expansion input and output (IO) interfaces, 4-20mA analog output, ProfiBus-DP and other industrial bus interfaces;
- Powerful network functions: support sensor data output, weight output, remote monitoring, remote upgrade and other functions to meet the needs of users for remote data transmission;
- Automatically record weighing data: Automatically record weighing data, which is convenient for query and verification.
Specifications
- Maximum input sensitivity (analog): 0.1uV/d;
- A/D conversion form (analog): ∑-△;
- A/D conversion speed (analog): 100 times/second;
- A/D resolution (analog): 2000000 yards;
- Sensor excitation: DC5V (analog sensor);
- DC8V, DC12V, DC24V (digital sensor);
- Maximum display division number: 100000;
- Number of sensors: digital sensors ≤ 16;
- Analog sensor (350Q) ≤10;
- Abundant interfaces: 2 RS232/485/20mA current loop interfaces, 1 Ethernet port, 1 parallel printing interface, 4-way input and 4-way output (optional), 4~20mA analog
Output (optional), ProfiBus-DP industrial bus interface (optional).
S15-PC industrial intelligent weighing indicator
T-Scale’s S15-PC industrial intelligent weighing indicator perfectly combines the weighing instrument with the industrial PC, combines the checkweighing and counting functions, and is a high-end product aiming at intelligent weighing, food-grade processing and large-screen touch control. Widely used in electronics, chemical industry, food, biomedicine and other industrial application environments.

Features
- Quad-core 2.0GHz processor and fast solid-state drive (SSD)
- Support Win7, Win8, Win10, PosReady operating system
- Support third-party software development and application
- 15.6 inch resistive touch screen
- Stainless steel waterproof design
- Abundant peripheral interfaces: USB, RJ45, mother and child scale, RS232/RS422/RS485 interface
How to Set Up a Programmable Weighing Indicator?
The following general operation steps are suitable for most of programmable weighing indicators:
Power On and Automatic Zeroing
After connecting the AC power supply and turning on the power switch, the instrument performs a stroke self-check from “9999999” to “0000000” and automatically enters the weighing state after completion. If an external battery is used, the battery connection line needs to be connected first. Then, press the DC start switch to allow the instrument to enter the stroke self-check status.
During the stroke self-check process, press any key to stop the self-check.
If the weight on the scale deviates from the zero point during power-on but still within the set range, the instrument will automatically zero. For the parameter selection and setting method of the power-on zeroing range, please refer to the relevant calibration section.
During normal operation, the calibration switch should be set to the position that disables calibration (left).
Manual Zeroing (Semi-Automatic Zeroing)
Press the [Zero] key to make the instrument return to zero, and the zero mark symbol will light up.
When the displayed value deviates from the zero point but is within the zeroing range, the [Zero] key will function. Otherwise, the [Zero] key will not work. For the parameter selection and setting method of the zeroing range, please refer to the relevant calibration section.
The zeroing operation can only be performed when the stable symbol is on.
Tare Function Operation
Many weighing indicators provide three tare modes:
①. General Tare:
In the weighing display state, when the displayed weight is positive and the weighing is stable, press the [Tare] key to deduct the displayed weight value as the tare weight. At this time, the instrument displays a net weight of 0, and the tare mark symbol lights up.
②. Preset Tare:
In the weighing display state, press the [Preset Tare] key, and the instrument will display [P *.], indicating the original tare weight value. If you need to set a new tare weight value, you can enter it using the number keys and then press the [Enter] key to confirm.
③. Tare by Car Number:
In the weighing display state, press the [Car Number] key, and the instrument will display [o *****]. Enter the correct car number using the number keys, and then press the [Tare] key. At this time, the instrument retrieves the corresponding tare weight value from the memory and uses it.
In the weighing display state, taring can be performed continuously. When the tare weight is zero, the tare mark symbol will be off. When the instrument meets the zeroing conditions, pressing the [Zero] key can also set the tare weight to zero, and the tare mark symbol will be off.
Setting and Operation of Date and Time
Date setting
In the weighing display state, press the [Date] button, and the date indicator light will be on. The instrument will display the current date. If it is correct, press the [Enter] or [Weighing] button to exit. If it is incorrect, enter the correct date using the number keys, and then press the [Enter] button.
Time setting
In the weighing display state, press the [Time] button, and the time indicator light will be on. The instrument will display the current time and automatically advance. If the time is correct, directly press the [Enter] or [Weighing] button to exit. If the time is incorrect, enter the correct time using the number keys, and then press the [Enter] button.
Calibration Function
This instrument provides calibration functions for zero setting, full scale calibration and linear calibration. The calibration method and related parameters are detailed in the manual of different models.
Calibration switch should be set to the calibration prohibited position (left position) during normal operation.
Weighing
Put the weighing goods on the weighing platform, the weighing instrument will automatically display the weight value.
When the weight value is stable, the stable symbol will light up. At this time, you can take the weight value as the actual weight.
If the weight value is unstable, the weight value on the display will flicker, indicating that the weight value is unstable, and the actual weight value cannot be determined.
When the load exceeds the rated range, the upper limit alarm symbol will light up and the buzzer will sound continuously. At this time, please remove the excess load immediately.
When the weight value is negative, the negative symbol will be displayed in front of the weight value.
Data Output
The weighing devices provides standard RS232C serial interface, and the output data format can be customized according to user needs.
When the instrument is in weighing or standby state, press the [Print] key to output the weight data.
When the instrument is in printing status, press the [Print] key again to stop printing.
If the printer is not connected, or if the printer is not properly connected, the instrument will display “E1” or “E2” error code.
Power Off
Turn off the power switch when the instrument is not in use.
When the external power supply is used, please unplug the power cord to cut off the power supply.
When the battery is used, please turn off the power switch to cut off the power supply. If the instrument is not used for a long time, please take out the battery and charge it every three months to extend its service life.
Programmable Weighing Indicator Troubleshooting
During the repair process of a weighing indicator, we use a combination of visual inspection, component elimination, and confirmation of repairs to locate and solve problems. Once we identify the faulty or damaged circuit, we can move on to the next step of fixing it. This process helps us to identify common malfunctions in weighing indicators, such as inaccurate readings or display errors, and to apply the appropriate solutions.
Unable to return to zero after removing the object:
Check whether the sensor output signal value is within the standard range (A/D total amplification code/ internal code range/ bottom code range), if the signal value is not within the standard range, adjust the sensor’s adjustable resistor to bring the signal value within the standard range. If compensation is not possible, check if the sensor has a problem. If the sensor output is normal (scale body stable), lock the instrument fault. Generally, the problem lies with the amplification circuit and A/D conversion circuit. Then, based on the circuit principle, perform step-by-step testing and analysis to solve the problem.
Inaccurate weighing result:
Observe whether the internal code value is stable, whether there is friction in various parts of the sensor, whether the regulated power supply is stable, whether the operational amplifier circuit is normal, and whether the weighing of the four feet of the scale pan is average using weights for testing. Follow the instructions to further analyze the instrument locally or calibrate the weight.
Failure to power on:
First, determine whether the problem is caused by a fuse, power switch, power cord, or voltage switch. Check whether the transformer has AC voltage input and AC output. If the instrument has a battery, remove the battery and turn on the AC power to determine whether the problem is due to low battery voltage.
Then, check whether the rectification circuit, voltage stabilization circuit, and display driver circuit are abnormal. If there are no problems with these, check whether the processor and associated circuits are burned out.
Garbled display:
Remove the original display circuit and replace it with a normal one to see if it is normal. If the display is normal, it indicates that the display circuit has a problem. If it is not normal, check whether the driver circuit is faulty, and then check whether the pin output of the processor display is within a reasonable output range.
Unresponsive buttons:
Gennerally, we need to test it with a new button. If the new button works properly, it can be determined that the button contact is poor. Measure whether there is a circuit break or virtual welding between the button and the CPU. Check whether the button holder has poor contact. Measure whether there is a short circuit or an open circuit between the diode, resistor, and the CPU circuit.
Unable to reach full load:
This is similar to the inability to return to zero, and is mostly due to changes in the small signal input range. Follow the method of unable to return to zero to check. If the problem cannot be found, first check whether the power supply and A/D circuit are normal, and then check the sensor output.
Sensor fault identification method:
① Static measurement method: Use the ohm range of the multimeter to measure whether the resistance value of E+ to S+ or E- to S+ (or E- to S- also works) of the sensor is the same. Generally, if the error is more than 0.5Ω, compensation is required. If the error is too large (more than 2Ω), it is recommended to replace the sensor.
② Dynamic measurement method: Connect the sensor wiring back to the motherboard correctly, use a digital meter (more than four and a half digits is better) on the DC V range, and measure whether the voltages of S+ to ground and S- to ground are equal (0 error ), if they are not equal, sensor compensation is required.
Digital dashboard fault:
The maintenance of digital dashboard is relatively simple. It only needs to check the power supply circuit, communication circuit, CPU micro-processing circuit, storage circuit and display circuit. According to the instructions in the manual, judge and solve the problems of different error phenomena and actual measurement results. The premise is to ensure the normal performance of the digital sensor.