More and more embedded devices nowadays support remote automatic upgrades without the need for downloaders, making device maintenance highly convenient. To enable remote upgrades for a device, we need to write program code that supports the upgrade process. This program is commonly referred to as the BootLoader.
In essence, the device’s program code is divided into two parts: the BootLoader and the APP. The BootLoader is responsible for upgrading the APP and initiating its execution. The APP, on the other hand, is responsible for implementing the device’s operational functions, essentially housing the core functionality of the device.
For Cortex-M series microcontrollers, achieving a secure transition from the BootLoader to the APP requires certain configurations. This article takes STM32 microcontrollers as an example to outline the key configuration steps necessary to implement a successful transition from the BootLoader to the APP.
BootLoader Jump to APP
Step 1: Flash Partition
During the phase of programming and design, it’s important to partition the Flash memory based on the specific application requirements. This involves determining where the BootLoader and APP will be stored, as well as the allocated space for each. This storage placement directly affects the program’s execution and transitions.
One of the simplest upgrade strategies involves having a BootLoader and an APP. The BootLoader handles transitions and facilitates APP upgrades. This article uses this upgrade strategy as an example for explanation.
For STM32 microcontrollers, the mapped address for program startup is 0x8000000.
The BootLoader can be stored at address 0x8000000, and the allocated space can be adjusted based on the specific Flash size of the chip, for instance, 0x10000 or 64KB.
The APP’s storage address is placed after the BootLoader, specifically at address 0x8010000. The remaining space in the Flash can be allocated to the APP.
Step 2: BootLoader Project Configuration
Configuring the BootLoader project involves a few steps. Using MDK as an example, the BootLoader program is stored in FLASH memory at address 0x8000000 with a size of 0x10000.
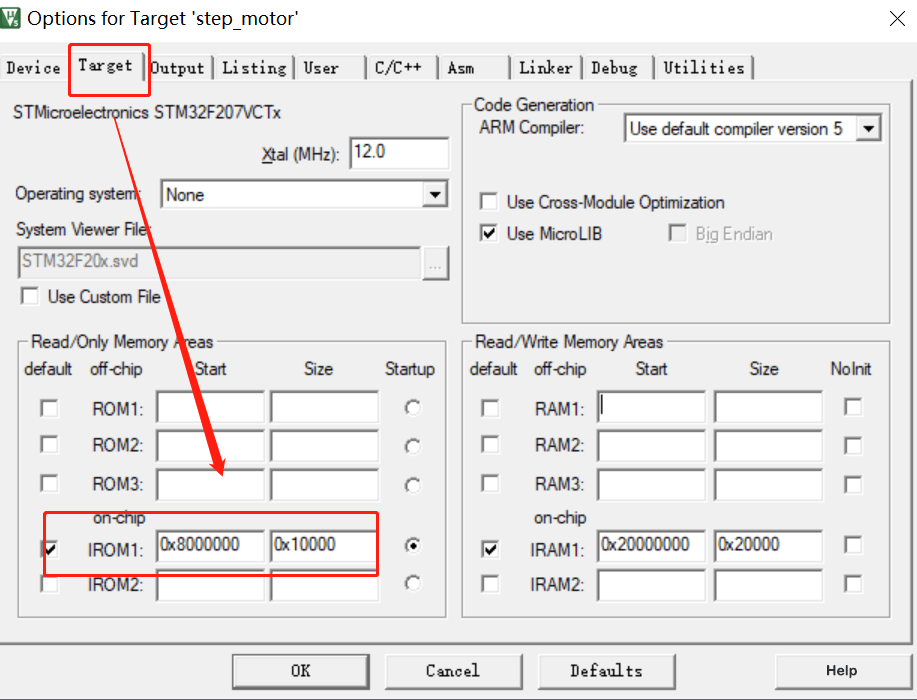
When transitioning to the APP using program code, consider the following points:
- Verify the validity of the stack top address, meaning if the starting address of the APP is valid.
if(((*(__IO uint32_t *)APP_FLASH_ADDR) & 0x2FFE0000) == 0x20000000)
- Disable all interrupts to prevent disturbances during the transition that could lead to exceptions.
- Obtain the starting address of the APP program, which is stored as the second word (starting address + 4, data stored in Flash).
- Initialize the stack pointer (the first word in the user code area holds the stack top address).
- Convert the starting address of the APP into a function pointer type and perform the transition.
The specific code for the transition is as follows:
					/* Define type */
typedef void (*pFunction)(void);

/* APP flash address */
#define APP_FLASH_ADDR             (0x8010000)

void jump_to_app(void)
{
  uint32_t JumpAddress;
  pFunction Jump_To_Application;

  /* Check if the stack top address is valid */
  if(((*(__IO uint32_t *)APP_FLASH_ADDR) & 0x2FFE0000) == 0x20000000)
  {
    /* Disable all interrupts to prevent disturbances during transition */
    __disable_irq();

    /* The second word in the user code area is the program's start address (reset address) */
    JumpAddress = *(__IO uint32_t *) (APP_FLASH_ADDR + 4);

    /* Initialize the user application's Stack Pointer */
    __set_MSP(*(__IO uint32_t *) APP_FLASH_ADDR);

    /* Type conversion */
    Jump_To_Application = (pFunction) JumpAddress;

    /* Transition to the APP */
    Jump_To_Application();
  }
}
Step 3: APP Project Configuration
Similarly, the APP project requires certain configurations. Using MDK as an example, the APP program is stored in FLASH memory at address 0x8010000 with a size of 0x30000.
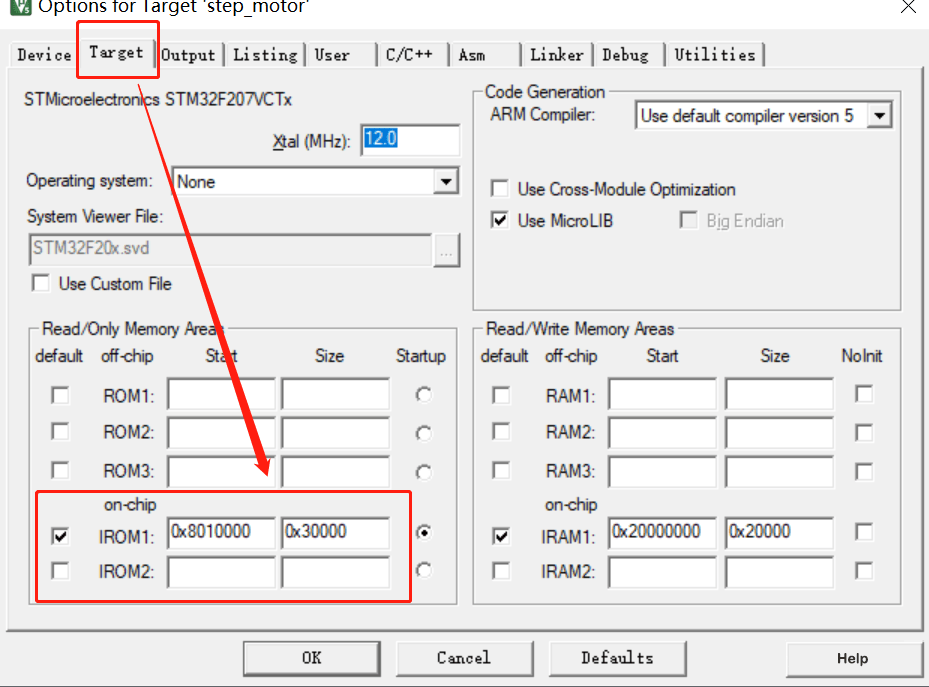
The configuration for the APP program involves the following steps:
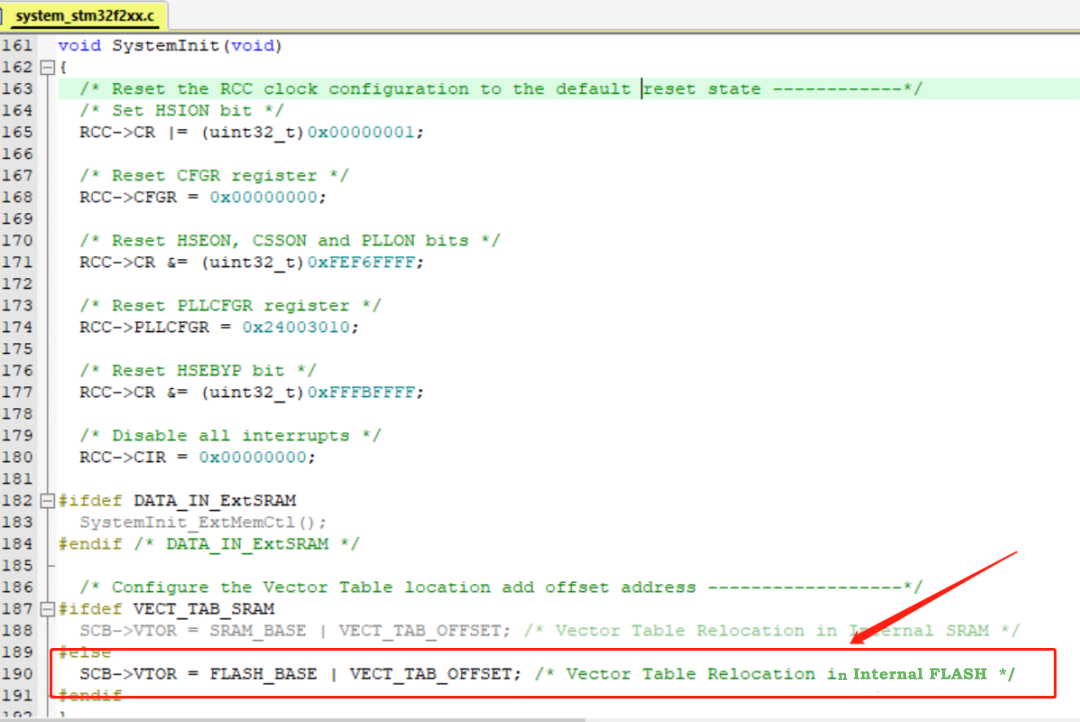
- Relocate the internal Flash vector table in the APP by modifying SCB->VTOR.
- After the APP starts running, it’s essential to enable interrupts in the initialization function to ensure smooth program execution. Failure to do so could lead to program anomalies.
Normally, in the startup file, the SystemInit() function is called. This function configures the interface information of the Flash.
SCB->VTOR = FLASH_BASE | VECT_TAB_OFFSET
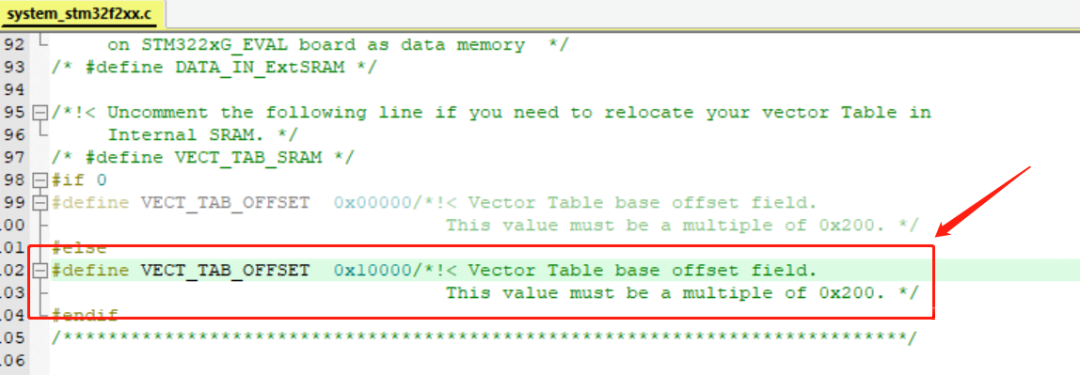
Modify the value of the macro definition VECT_TAB_OFFSET to 0x10000.
After the APP program starts, it’s crucial to enable global interrupts. You can place the following code in the initialization section:
					/* Enable interrupts */
__enable_irq();
APP Jump to BootLoader
During the operation of the device, the APP is running and processing business functions. If you want to upgrade APP, you need to switch from APP to BootLoader. So, how to realize APP jump to BootLoader? There are two methods:
- Hardware mode, device power off restart or reset button
- Software mode, reset MCU through software control
In the software mode, control commands can be added to the APP code, and when the APP receives the jump command (or upgrade command)), the MCU will be reset. The following code can reset the MCU:
					/* reset chip */
HAL_NVIC_SystemReset();

