The ESP32 is a low-power, low-cost, ultra-low-power system-on-chip microcontroller board developed by Espressif Systems. However, there are occasions when you may encounter difficulties in uploading your sketches to the board. This can be caused by several factors, such as incorrect wiring, incorrect power supply or incorrect settings. In this article, we’ll look at the common issues that can cause the ESP32 not to upload sketches to the PCB. We’ll also provide some helpful tips on how to get your sketches uploaded successfully. So, if you’re having trouble programming your ESP32, read on to find out more.
Overview of the ESP32 Microcontroller
The ESP32 is based on a dual-core Tensilica Xtensa LX6 32-bit microprocessor, 4 MB of SPI Flash, and 8 MB of PSRAM. It has both Wi-Fi and Bluetooth connectivity, as well as a number of GPIO pins, ADC pins, touch sensors, temperature sensors and more. The ESP32 is suitable for a wide range of applications, including home automation, IoT, wearables, robotics, and more. It can be used to control lights, motors, and other things as well as to collect and send data over the internet.
ESP32 Not Upload Sketch PCB and Solutions
The ESP32 features an integrated Wi-Fi and Bluetooth module, as well as an onboard processor, making it ideal for developing IoT solutions. The ESP32 also has several pins that allow it to be connected to external hardware, such as sensors and actuators. To get started with the ESP32, you will need to upload a sketch, which is a program written in the Arduino IDE. But when you’d like to DIY your ESP32 board, many people may see some errors like these:
- “A fatal error occurred: Timed out waiting for packet content”
- “A fatal error occurred: Timed out waiting for packet header”
					esptool.py v3.0-dev
Serial port /dev/ttyUSB0
Connecting...
Chip is ESP32-S3-WROOM-1
Features: WiFi, BT, Dual Core, 240MHz, VRef calibration in efuse, Coding Scheme None
Crystal is 40MHz
MAC: 84:cc:a8:7f:39:14
Uploading stub...
Running stub...
Stub running...
Changing baud rate to 921600
Changed.
Configuring flash size...
A fatal error occurred: Timed out waiting for packet header
A fatal error occurred: Timed out waiting for packet header
Verified Solution 1:
- Press and hold the BOOT key on the development board and do not release it;
- Click “Upload” on the arduino IDE;
- When the “Connecting” prompt appears, release the BOOT key.
Verified Solution 2:
- Change the “upload speed” from 921600 baud to 115200 baud.
After that, you should be able to upload your sketch to the ESP32 board sucessfully. If it still doesn’t work, please keep reading our further guides below.
Common Reasons for ESP32 Not Uploading Sketches
There are a number of reasons why you failed to upload a sketch to ESP32. The most common reasons are incorrect wiring, incorrect power supply and incorrect settings. These issues can be generally resolved by checking the wiring and settings, and making sure that the correct power supply is being used.
Wiring Your ESP32 Correctly
In order to upload a sketch to the ESP32, you will need to make sure that the wiring is correct. This includes connecting the correct pins to the correct ports. For example, the TX and RX pins should be connected to the correct UART port. If the wiring is incorrect, the ESP32 will not be able to communicate with the Arduino IDE.
Powering Your ESP32 Correctly
Another common issue is using the incorrect power supply. The ESP32 requires a 3.3V power supply, while the Arduino IDE requires a 5V power supply. If the wrong voltage is used, the ESP32 will not be able to upload a sketch.
Setting the Correct Upload Speed
When uploading a sketch to the ESP32, the upload speed must be set correctly. The upload speed should be set to 115200 baud in the Arduino IDE. If the upload speed is set too high or too low, the ESP32 will not be able to upload a sketch.
Best Practices of Upload Sketch to ESP32
To successfully upload your programs to the ESP32 board, please follow these best practices:
- Create an Arduino sketch and save it. (you can save an empty sketch)
- Then, go to “Sketch > Show Sketch Folder”.
- Create a new folder called data inside the sketch folder.
- Put the program files in the data folder.
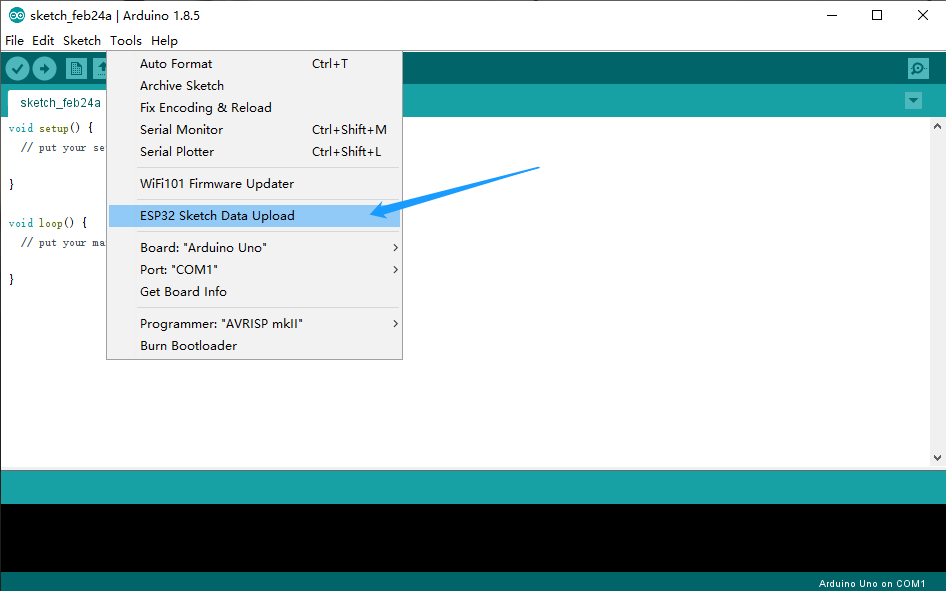
- Finally, go to “Tools > ESP32 Sketch Data Upload” and upload the program.
ESP32 Sketch Data Upload not showing and Solutions
If the “ESP32 Sketch Data Upload” option is not showing in the Arduino IDE, it’s likely due to an incorrect configuration in the Arduino IDE itself. To fix this, please have a try according to the below steps:
Step 1: Install the ESP32 board in Arduino IDE
Installing the ESP32 board in Arduino IDE can be done in a few steps:
1. Download the Arduino IDE from the official website: First, download the Arduino IDE from the official Arduino website (https://www.arduino.cc/en/Main/Software). The latest version is recommended for the best compatibility with the ESP32 boards.
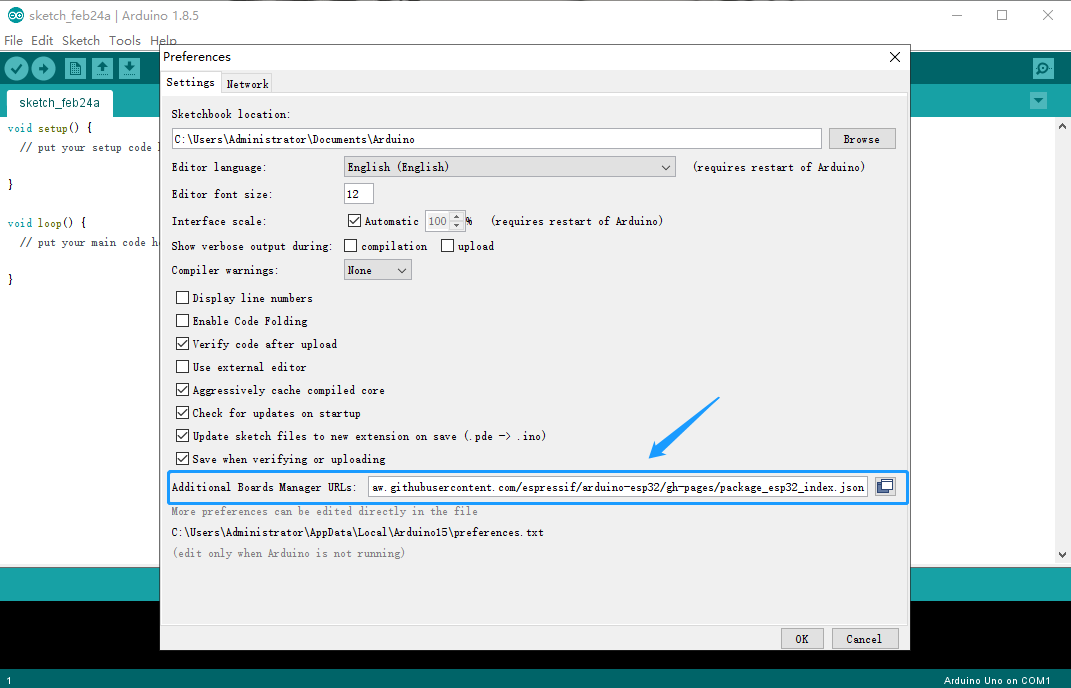
2. Setup the Arduino IDE for the ESP32 Board: To setup the Arduino IDE for the ESP32 board, you need to add the ESP32 board to the Arduino IDE boards manager. To do this, open the preferences window (File > Preferences), and paste one of the following URLs into the “Additional Boards Manager URLs” field:
- https://dl.espressif.com/dl/package_esp32_index.json
- https://raw.githubusercontent.com/espressif/arduino-esp32/gh-pages/package_esp32_index.json
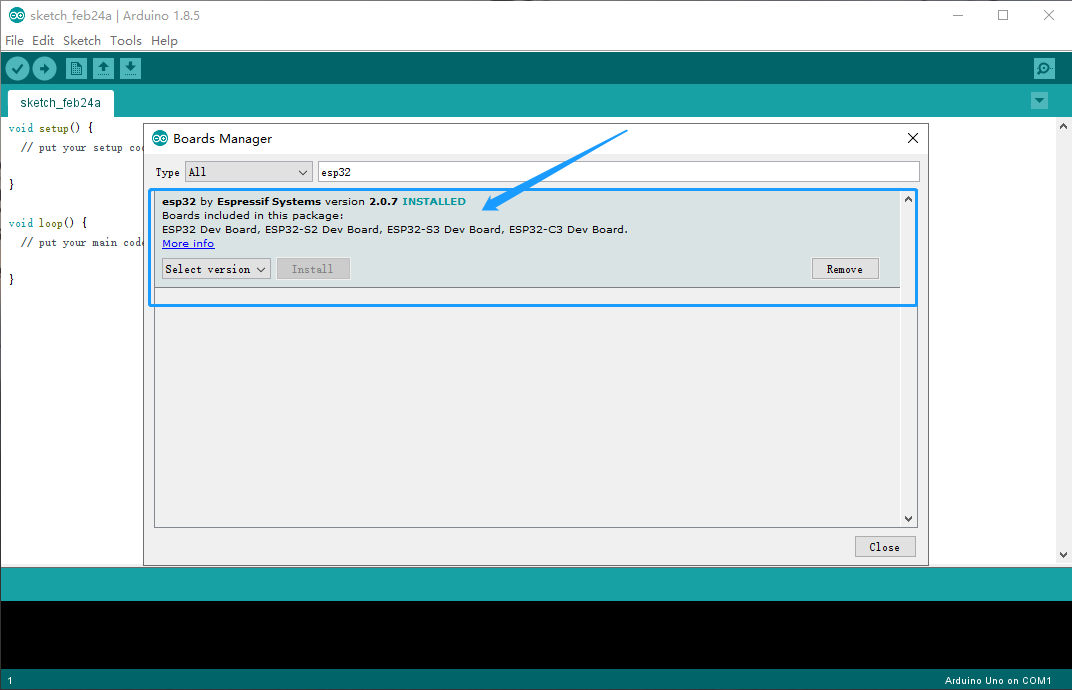
3. Install the ESP32 Board Package: Next, go to Tools > Board > Boards Manager and search for “ESP32”. Select the latest version to install. The installation process may take a few minutes.
4. Search for ESP32 and press install button for the “ESP32 by Espressif Systems“:
5. Now, the ESP32 board should now be installed in the Arduino IDE and ready for development.
Step 2: Install the Arduino ESP32 Filesystem Uploader
Installing the Arduino ESP32 Filesystem Uploader in Arduino IDE is a relatively simple process that can be completed in a few steps.
Note: the new Arduino 2.0 version don’t support the ESP32 Filesystem Uploader plugin.
- Download the ESP32 filesystem uploader – “ESP32FS-1.0.zip” from the following URL:
https://github.com/me-no-dev/arduino-esp32fs-plugin/releases/tag/1.0
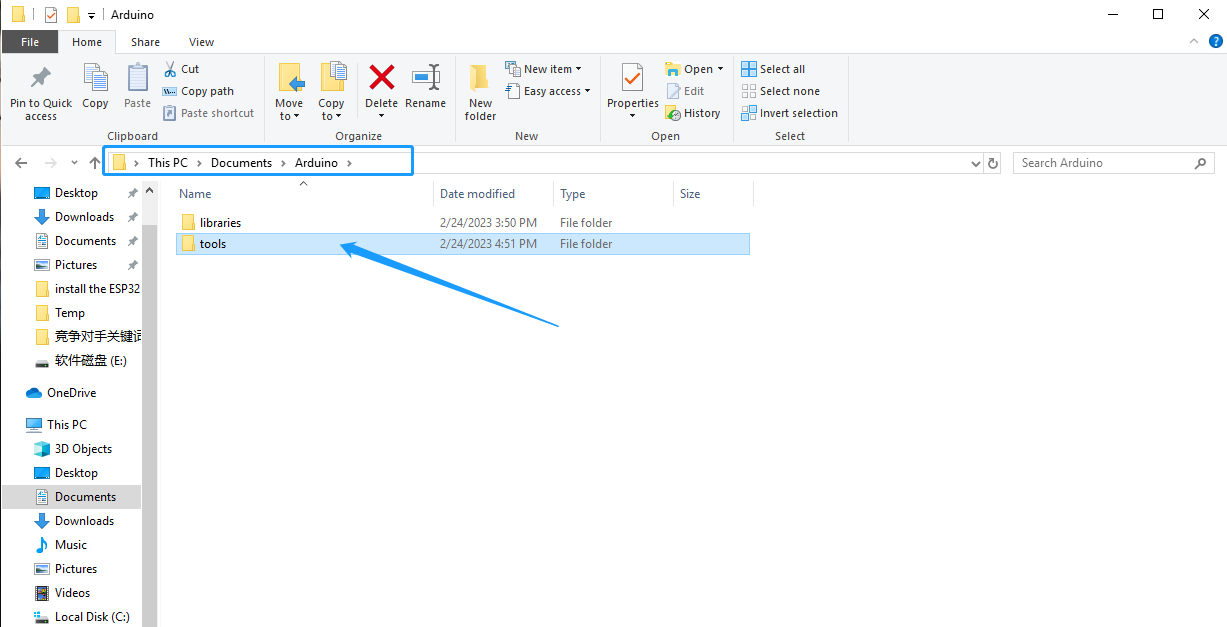
2. In Arduino IDE, go to File > Preferences and find the “Sketchbook location”.
3. Browse the sketchbook location in your computer, and create a folder named “tools”.
4. Unpack the “ESP32FS-1.0.zip”, and then open the “ESP32FS-1.0” folder. In deeper path, you’ll see a “ESP32FS” folder, please move it to the “arduino > toos” folder.
5. Finally, quit and launce the Arduino IDE again. You should see the new option “ESP32 Sketch Data Upload“ under the Tools menu.


