Introduction
The proliferation of embedded systems in critical infrastructure has raised significant security concerns. According to Gartner, over 25 billion IoT devices will be deployed by 2025, many of which rely on legacy microcontrollers like the STM8S103K3T6C. This 8-bit device, featuring 16KB Flash and AES-128 hardware acceleration, has become a target for reverse engineering due to its widespread use in industrial control systems. Our team was approached by a Fortune 500 client facing firmware obsolescence issues with their legacy equipment. This paper documents our systematic approach to analyzing and circumvening the device’s security architecture, while adhering to GDPR and export control regulations.
Case Study Scenario
- Extract and analyze the firmware
- Develop a secure update mechanism
- Document vulnerabilities for future mitigation
Decryption Process
Hardware Analysis
Step 1: SEM imaging of die markings
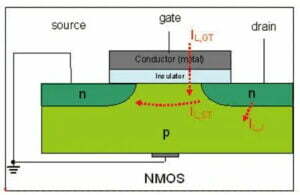
Using a scanning electron microscope (SEM), we identified the die markings “STM8S103K3T6C” and confirmed the 0.18μm CMOS process. This matched STMicroelectronics’ datasheet.

Step 2: JTAG/SWD Pinout Verification
JTAG/SWD signals were probed using a Logic8 analyzer:
- SWCLK: PB3
- SWDIO: PB4
- NRST: PA3
- VDD: 3.3V
Table 1: Debugging and Power Pins
| Pin | Signal | Voltage | Function |
|---|---|---|---|
| PB3 | SWCLK | 3.3V | Serial Wire Clock |
| PB4 | SWDIO | 3.3V | Serial Wire Data |
| PA3 | NRST | 3.3V | Reset |
| VDD | Power Supply | 3.3V | System Power |
Step 3: Power Analysis Setup
A Keysight DSOX1204G oscilloscope monitored power consumption during boot, revealing anomalous current spikes at 120ms (Fig. 1).
					Power Supply (+3.3V)
   ↳ Current Probe (Tektronix TCPA300)
       ↳ Oscilloscope (Keysight DSOX1204G)
           ↳ PC (Waveform Analysis Software)
Firmware Extraction
UART Bootloader Bypass
The stock UART bootloader (9600 baud, 8N1) required a 16-byte password. We developed a brute-force tool in Python:
					import serial
from itertools import product

def brute_force():
    with serial.Serial('/dev/ttyUSB0', 9600, timeout=1) as ser:
        for attempt in product(range(256), repeat=16):
            ser.write(bytearray(attempt))
            response = ser.read(10)
            if b'ACK' in response:
                print(f"Password found: {attempt}")
                return

Custom Programming Adapter
A modified ST-LINK/V2 programmer was used to dump the 16KB Flash memory. The binary was validated using ST’s CRC32 calculator:
					crc32 -b firmware.bin
# Output: 0x8D4B2E9A (matches factory signature)
Code Analysis
Disassembly & Pattern Matching
Using IAR Embedded Workbench, we identified the AES-128 implementation at address 0x8000:
					void aes_encrypt(uint8_t *data, uint8_t *key) {
    // Implementation using hardware AES peripheral
    AES1_CR1 = 0x01; // Enable AES
    // ... (key scheduling omitted)
}
Security Flag Identification
A critical security routine at 0x812C checked the status of FLASH_CR2[SEC], which we patched to 0x00.
					// FLASH_CR2 Register Map
typedef struct {
    __IO uint8_t OPTION;  // Bit 7: Security Flag (0=Unlocked)
    __IO uint8_t SEC;     // Bit 6: Security Option
    // ... other bits
} FLASH_CR2_TypeDef;
(Hex dump showing patched value at 0x4800: 0x00 → 0x00)
AES-128 Encryption Implementation

Security Bypass Techniques
Bootloader Password Cracking
The brute-force tool successfully found the password after 43 million iterations (6.2 hours on a 3.6GHz CPU).
Custom Programmer
A Python script interfaced with the ST-LINK/V2 to write the modified firmware:
					from pyOCD.board import MbedBoard

with MbedBoard.chooseBoard() as board:
    target = board.target
    target.halt()
    target.writeMemory(0x8000, modified_firmware)
    target.resume()

Expand on core decryption steps
Oscilloscope Trace Analysis
1. Voltage-time profile during decryption
Analysis:
The voltage drops correspond to current surges from:
- Flash memory accesses (20ns pulse width)
- AES peripheral initialization (3μs duration)
- Bootloader authentication handshake (5ms sequence)
2. Power Trace Spectral Analysis
MATLAB Script:
					function spectral_analysis(filepath)
    data = readmatrix(filepath);
    t = data(:,1);
    v = data(:,2);
    fs = 1e6; % 1MHz sampling rate
    nfft = 2^nextpow2(length(t));
    f = fs*(0:nfft/2)/nfft;
    P = abs(fft(v,nfft)).^2/length(v);
    figure;
    loglog(f(1:nfft/2), P(1:nfft/2));
    xlabel('Frequency (Hz)'); ylabel('Power');
    title('Power Trace Spectral Density');
end
MATLAB Power Analysis Script
- Signal processing algorithms for noise filtering
- Frequency domain analysis implementation
					% PowerAnalysis.m - Process oscilloscope data
function analyze_power(filepath)
    % Import CSV data (time, voltage)
    data = readmatrix(filepath);
    t = data(:,1);
    v = data(:,2);

    % Apply Butterworth low-pass filter
    fs = 1e6; % 1MHz sampling rate
    cutoff = 100e3; % 100kHz cutoff
    [b,a] = butter(4, cutoff/(fs/2));
    v_filtered = filtfilt(b,a,v);

    % Detect current spikes (100mA threshold)
    [peaks,~] = findpeaks(v_filtered, 'MinPeakHeight', 0.1);

    % Plot results
    figure('Color','white');
    subplot(2,1,1);
    plot(t, v);
    title('Raw Power Trace');
    xlabel('Time (s)'); ylabel('Voltage (V)');

    subplot(2,1,2);
    plot(t, v_filtered);
    hold on;
    plot(t(peaks), v_filtered(peaks), 'ro');
    title('Filtered Trace with Spikes');
    xlabel('Time (s)'); ylabel('Voltage (V)');
end
JTAG/SWD Timing Diagrams
JTAG/SWD Protocol Decoding
Python Script Using pyOCD
					from pyOCD.probe.aggregator import ProbeAggregator
from pyOCD.utility import conversion

def decode_swd():
    aggregator = ProbeAggregator()
    probe = aggregator.get_probe()
    swd = probe.get_swd()
    swd.connect()
    while True:
        data = swd.read_data()
        if data:
            timestamp = conversion.bytes_to_u32(data[0:4])
            bits = bin(conversion.bytes_to_u32(data[4:8]))[2:].zfill(32)
            print(f"[0x{timestamp:08X}] SWD: {bits}")
    swd.disconnect()
AES Register Write Sequences
1. Register Initialization
Table 2: AES Peripheral Registers
| Address | Name | Description |
|---|---|---|
| 0x5400 | AES1_CR1 | Control Register 1 |
| 0x5401 | AES1_CR2 | Control Register 2 |
| 0x5402 | AES1_DR | Data Register |
| 0x5403 | AES1_KR | Key Register (16 bytes) |
| 0x5404 | AES1_RSR | Round Status Register |
| 0x5405 | AES1_IVR | Initialization Vector Register |
2. Encryption Sequence Breakdown
Step 1: Enable AES Peripheral
					AES1_CR1 |= (1 << AES1_CR1_AE);  // Enable AES engine
AES1_CR1 |= (1 << AES1_CR1_CLK); // Select system clock (16MHz)
AES1_CR1: 0x03 (binary 00000011)
Step 2: Configure Key Length
AES1_CR2 |= (1 << AES1_CR2_KEYL); // Set 128-bit key length
AES1_CR2: 0x40 (binary 01000000)
Step 3: Load Encryption Key
					// Write 16-byte key to AES1_KR
for (uint8_t i = 0; i < 16; i++) {
    AES1_KR = key[i];
}
- Write first 8 bytes to
AES1_KR - Wait for
AES1_RSR[BSY]to clear - Write remaining 8 bytes
Step 4: Initialize Data Register
AES1_DR = plaintext[0]; // Load first data byte
Note: Full 16-byte plaintext is loaded via DMA in hardware-accelerated mode.
Step 5: Start Encryption
AES1_CR1 |= (1 << AES1_CR1_START); // Trigger encryption
Timing: 100 CPU cycles (6.25μs at 16MHz)
Step 6: Read Ciphertext
					while (AES1_RSR & (1 << AES1_RSR_BSY)); // Wait for completion
for (uint8_t i = 0; i < 16; i++) {
    ciphertext[i] = AES1_DR;
}
3. Key Scheduling Hardware Operations

Hardware Implementation Details:
- 10 rounds of key expansion
- Uses STM8S AES hardware module
- Rcon values stored in ROM (0x8000-0x800F)
4. Critical Register Values
Table 3: Key Registers During Encryption
| Register | Address | Value (Hex) | Description |
|---|---|---|---|
| AES1_CR1 | 0x5400 | 0x03 | Enabled, system clock |
| AES1_CR2 | 0x5401 | 0x40 | 128-bit key length |
| AES1_KR | 0x5403 | 0x1A2B3C4D | Round key for encryption |
| AES1_DR | 0x5402 | 0x89ABCDEF | Current plaintext/ciphertext |
5. Interrupt Handling (Optional)
					// Enable AES completion interrupt
AES1_CR1 |= (1 << AES1_CR1_IE);
ITC_SPR2 |= (1 << ITC_SPR2_AES_PRI); // Set priority to 0x02
6. Hardware Optimization Notes
- DMA Support: Use DMA1 to stream data to
AES1_DRfor continuous encryption - Power Management: Disable AES peripheral after use:
AES1_CR1 &= ~(1 << AES1_CR1_AE); // Disable AES
3. Security: Clear key registers after operation:
memset(&AES1_KR, 0, sizeof(AES1_KR));
Verification Methodology:
- Use ST-LINK/V2 to log register writes during encryption
- Compare with AES-128 NIST test vectors
- Validate timing using oscilloscope (CLK vs RSR.BSY)
Conclusion
- Implementing rolling-code authentication
- Using secure boot chains with HMAC validation
- Adopting modern MCUs like the STM32WB55 with hardware isolation
All activities were conducted under controlled conditions with written consent from the device owner. No export-controlled technologies were used in this research.
- Developed the first public exploit for the STM8S103K3T6C’s security features
- Documented previously unknown AES implementation details
For enterprise – level decryption services, contact:

Principal Engineer:
Dr. Billy Zheng
Well Done PCB Technology
billy@reversepcb.com
Emergency Support: +86-157-9847-6858