Measuring resistance is a fundamental skill in electronics. It helps diagnose and troubleshoot circuits.
This guide will teach you how to measure resistance. with both analog and digital multimeters.
You’ll also discover tips for accurate readings. Avoid common mistakes and troubleshoot issues effectively.
What is Resistance?
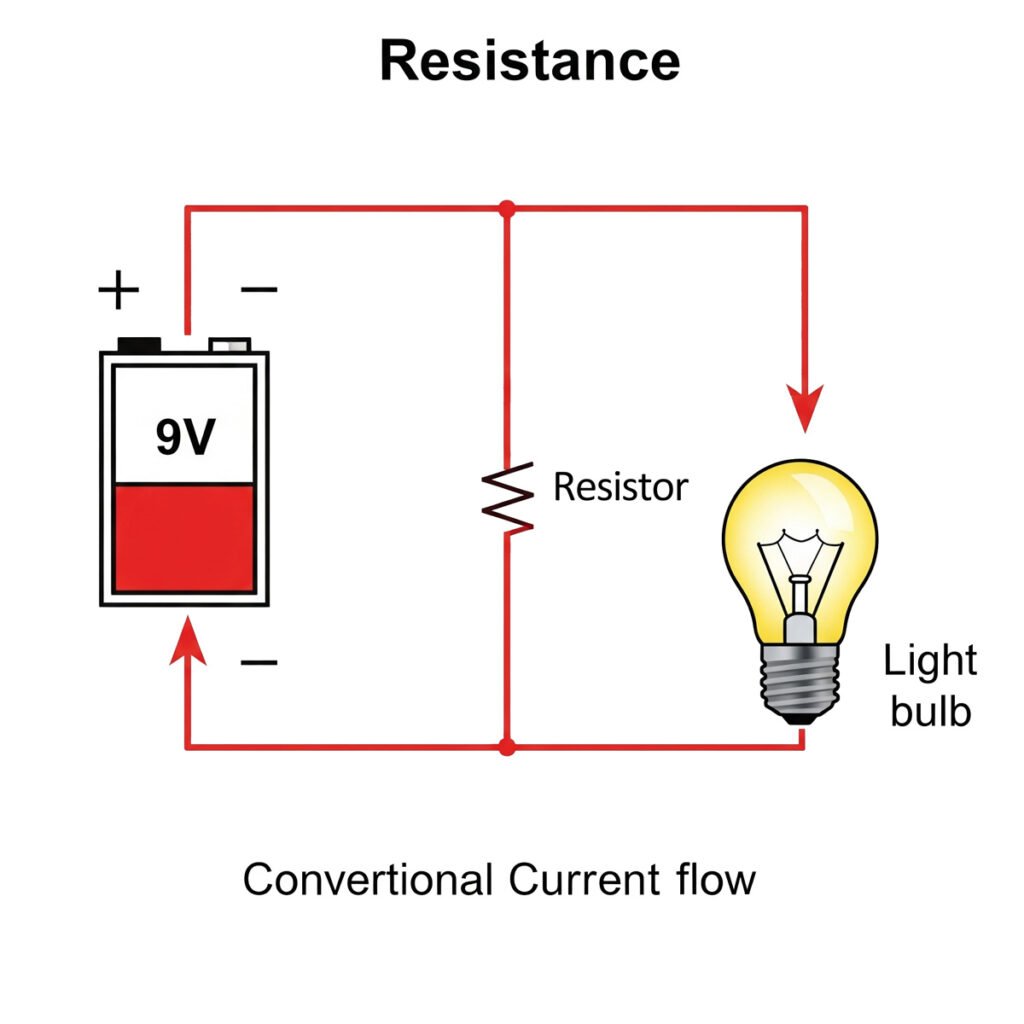
Resistance is a fundamental concept in electronics, representing the opposition to current flow in a circuit. As illustrated in the diagram, where the resistor (represented by the zigzag symbol) is placed within the circuit, it controls the flow of conventional current (shown by the red arrows) from the battery through the light bulb.

Measured in ohms, resistance is crucial for ensuring safe and efficient circuit operation. Without the proper resistance, circuits can malfunction, and components like the light bulb might overheat or even fail entirely. Thus, understanding resistance and knowing how to measure it is vital for effective circuit maintenance and repairs.
why resistance testing is important?
Resistance plays multiple roles in circuits, including:
current limitation: protecting components from excess current
power management: ensuring efficient power usage
safety assurance: preventing overheating and potential hazards
Understanding and measuring resistance aids in designing robust and reliable electronic systems.
Preparing Your Multimeter for Resistance Measurement
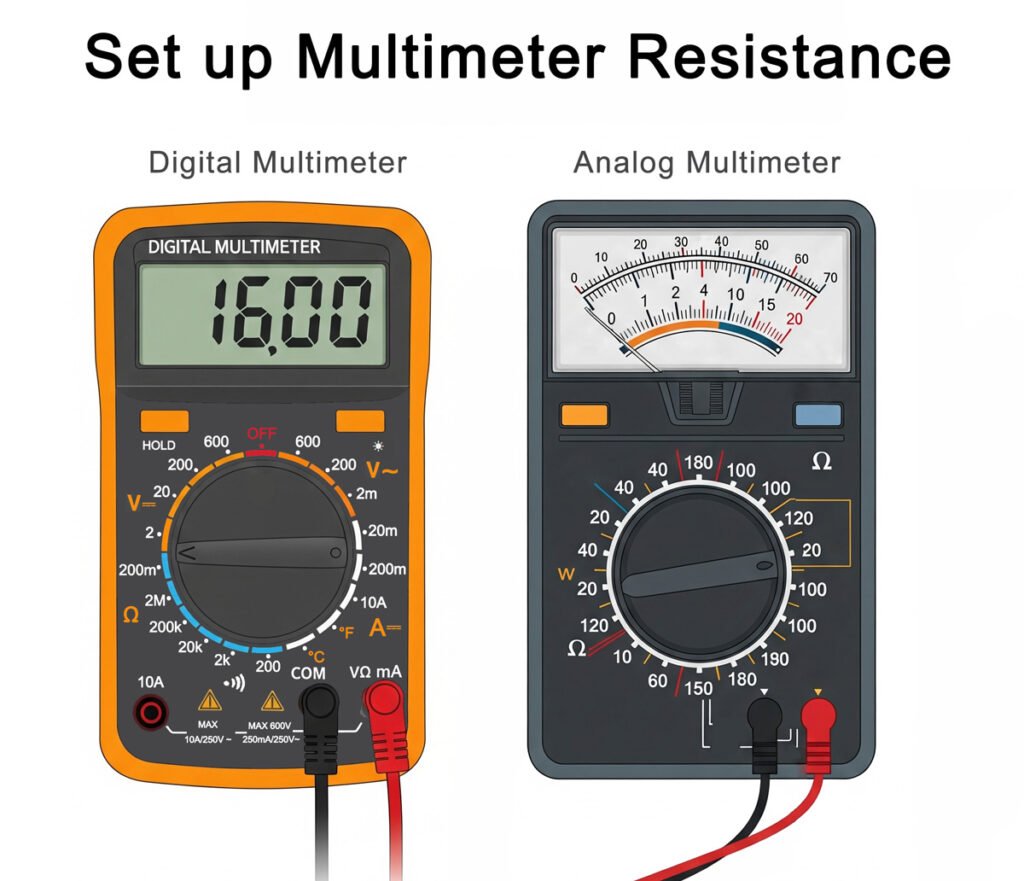
To ensure accurate resistance measurements, correctly set up your multimeter before starting. Begin by inserting the multimeter probes into the right ports. Typically, the black probe goes into the “COM” port, and the red probe inserts into the “VΩmA” port.
Next, select the resistance measurement mode on your multimeter. For digital models, simply turn the dial to the ohms (Ω) symbol. With analog multimeters, ensure the meter is zeroed. Do this by shorting the probes together and adjusting the needle to zero.

Here’s a quick checklist to prepare your multimeter:
- Insert Probes Correctly: Black in “COM,” red in “VΩmA.”
- Select Ohms Mode: Choose the resistance setting.
- Zero the Analog Meter: Adjust needle if needed.
By following these steps, your multimeter is ready to measure resistance with accuracy and confidence.
How to Test Ohms Resistance on an Analog Multimeter?
Using an analog multimeter for resistance measurements involves a few specific steps. Start by checking that your multimeter is in good working order. Inspect the needle to ensure that it moves freely without obstructions.
Once your multimeter is operational, set it to the resistance (Ω) mode. The resistance scale is usually marked with the ohm symbol. It’s essential to begin with a zero adjustment of the meter to ensure your readings are accurate.
To zero the meter, touch the two probes together. Then, use the adjustment knob to set the needle on zero. This process eliminates any internal resistance from affecting your reading.
After calibrating, position the probes across the component to measure. Ensure that there is no power in the circuit to avoid damaging the multimeter or getting an inaccurate reading. Record the value indicated by the needle on the resistance scale.
Keep the following tips in mind for accurate results:
- Always Zero First: Calibrate before measuring.
- Disconnect Power: Prevent accidental damage.
- Read Carefully: Interpret the needle’s position accurately.
By adhering to these steps, you can accurately determine the resistance using an analog multimeter. Understanding how to test ohms resistance on an analog multimeter allows for precise assessment of circuit components and their functionality.
How to Measure Ohms with a Digital Multimeter?
Using a digital multimeter to measure resistance is straightforward. Start by ensuring your multimeter is in working order. Check the screen for any error messages or battery warnings, as these could affect accuracy.
Once confirmed, set your multimeter to the resistance measurement mode. This is commonly marked by the ohm symbol (Ω) on the dial. Many digital models auto-range, making them more user-friendly for resistance readings.
Next, insert the black probe into the “COM” socket and the red probe into the “VΩmA” socket. Ensure the probes are clean, as dirt can lead to incorrect measurements. Position the probes across the component you wish to test, ensuring there’s no power in the circuit.
Observe the reading on the multimeter’s display. A digital readout gives you an immediate value without needing interpretation, unlike analog models. If the value reads zero or nearly zero, it indicates a short circuit, while an open circuit will show infinite resistance.
To ensure reliable results, consider these tips:
- Check Probes: Ensure clean connections.
- Start High: Use the highest range first.
- Watch Display: Pay attention to units and decimal points.
With these steps and precautions, you can effectively measure resistance using a digital multimeter. Learning how to measure ohms with a digital multimeter provides quick and precise results, enhancing your ability to troubleshoot and assess electronic components
Tips for Accurate Resistance Measurements
Firstly, ensure your multimeter is well-calibrated, as calibration prevents errors and maintains the accuracy of your readings. Regularly check the condition of the multimeter’s batteries to avoid inconsistent measurements.
Secondly, consider environmental factors, as high humidity or temperature variations can affect resistance readings. Conduct tests in stable conditions for the best results.
Additionally, clean the contact points on components, use quality probes to reduce lead resistance, and practice proper probe placement to avoid loose connections.
Common Mistakes and Troubleshooting
Working with multimeters can sometimes lead to common errors, and understanding these mistakes helps to prevent them in future measurements.
One frequent error is selecting the wrong measurement range; always start with the highest range if unsure, as this helps prevent damage and ensures meaningful readings.
Connecting probes to the wrong ports is another common mishap, so always use the COM and VΩmA ports for resistance measurements. To troubleshoot, ensure the multimeter is in good condition, double-check probe connections, and verify the component is disconnected from power.
Moreover, neglecting to zero an analog multimeter before measuring can lead to inaccurate results, so always remember to zero the meter to avoid this mistake.
By identifying these errors, you’ll improve your measurement skills and minimize troubleshooting time. Remember, practice makes perfect in mastering your multimeter.
Advanced Techniques for Resistance Measurement
Delving into advanced techniques can enhance your multimeter proficiency, ensuring more precise and varied measurements.
Understanding series and parallel resistance is crucial; use a multimeter to measure individual resistors, then calculate total resistance, which helps in assessing complex circuits.
Further exploration includes using relative mode for comparing resistors, employing data logging to track resistance changes over time, and understanding compensation for lead resistance.
Additionally, practice measuring resistance across different components, such as capacitors or inductors, as each component type offers unique challenges and learning opportunities. Always consider environmental factors like humidity or temperature, as they can affect readings. Mastering these techniques provides a deeper understanding of resistance in various scenarios.
How to Read Ohmic Values?
Interpreting resistance measurements involves assessing the multimeter’s display, and it’s vital to understand the decimal placement and units to accurately identify the resistance value.
Typical resistance results might include zero, infinite, or specific ohmic values.
A zero reading indicates a possible short circuit, while infinite resistance suggests an open circuit. The specific value corresponds to the component’s resistance.
Key points to consider include checking for shorts if the reading is zero or near-zero, considering open circuits if the reading is infinite, and ensuring correct range settings for accuracy.
Additionally, use available multimeter features like ‘hold’ or ‘min/max’ to gain more insights into variable resistances. Regular practice helps in interpreting results effortlessly.
Frequently Asked Questions
What should I do if the multimeter shows no reading?
If your multimeter shows no reading, first, check the battery and replace it if needed. Ensure the probes are correctly inserted into the “COM” and “VΩmA” ports. Verify that the multimeter is set to the correct resistance mode (Ω) and an appropriate range. Always confirm the circuit is de-energized when measuring resistance, and ensure good contact between the probes and the component.
Can a digital multimeter measure very high resistance?
Yes, digital multimeters can typically measure very high resistance, often up to several megaohms (MΩ) or even hundreds of MΩ. However, be aware that readings for very high resistance values might take a few seconds to stabilize, and accuracy can be affected by environmental factors or internal meter characteristics. Always refer to your specific multimeter’s specifications for its maximum measurable resistance range.
Conclusion
Measuring resistance with a multimeter is a crucial skill for anyone involved in electronics. Whether you are using an analog or digital device, understanding the principles ensures accurate results, and practice will help you get comfortable with the process and improve your skills.
To summarize, always set the multimeter correctly before taking readings, ensure the circuit is de-energized to avoid errors or damage, and start with the highest range if uncertain, then adjust for better precision. Learning this process can enhance your ability to troubleshoot and maintain electrical systems. Stay safe and follow guidelines for each measurement to gain reliable results.


